 I went to visit my sister this weekend and went on a bit of a shopping spree! We hit the mall and our usual spots, and I also stopped in to her local Joanns. Even though most Joanns stores are pretty much the same, every once in a while I'll find one or two fabrics that either my store doesn't have or has sold out of.
  The fabric on the left is a retro floral knit that I haven't seen at my store. The owl fabric is one I've used a lot in knit, but my store sold out of the woven print a long time ago. The print on the right just jumped out at me and made me think of Spring.
We also spent 4 hours at IKEA! I absolutely, positively LOVE IKEA. Among some of my finds there was this white polka dotted laminated fabric, something I didn't realize they carried. This will probably become a little lunch tote for my mom's birthday next month.
 The best part of my shopping trip was picking up a few things to reorganize my sewing space. Here's my messy space before....
 And here's after. I got a new bookcase to store fabric and some magazine files for patterns
.....
and did some cleaning. I am totally in love with this little rail and container set I picked up for $5. It holds all my scissors and pens etc, and is at such a nice angle that it's easy to grab stuff and throw it back in. I almost wish I'd bought the longer rail and gotten more containers. Oh well, next time!
 I also did a little lighting upgrade. I've been using this light that I bought from IKEA a while ago. Only problem is, it just plugs in, it doesn't have a switch. So I visited Home Depot today and bought a little switch you wire in yourself.
 I contemplated waiting for my husband to come home, but that's not my style. I'm a jump in and do it (and maybe ruin it) kind of person. And I'm proud to say that I did it! Maybe not the best job....I think the wires aren't supposed to show on the ends, but hey, it works! I did tell my daughter to stand back the first time I plugged it in and tried to turn it on. I was fairly convinced it might blow up.
No more climbing under the desk to plug in my light!

Hope you had a good weekend!
 The time change this weekend hit me unusually hard. I was pretty much in sweats and a ponytail all day. And, I baked.
These muffins are like all the yumminess of bowl of oatmeal, in a moist muffin. And pretty guilt-free as well!
The original recipe is for gluten-free muffins....mine are not.
1 cup rolled oats
1/2 cup yogurt
1/2 cup milk
1/3 cup brown sugar
1/3 cup canola oil
2 ripe bananas, mashed
1 egg
1 1/2 cups whole wheat pastry flour
1 teaspoon cinnamon
1/2 teaspoon nutmeg
1/2 teaspoon salt
2 teaspoons baking powder
1 teaspoon baking soda
1/2 cup chopped walnuts
Preheat oven to 400 degrees F.
In a bowl, combine oatmeal, yogurt and milk. Mix and let soak for 15 minutes
Mix flour, cinnamon, nutmeg, salt, baking powder and baking soda in a bowl.
Add brown sugar, egg, bananas and oil to the soaked oatmeal and mix well. Add walnuts and mix well.
Add the oatmeal mixture to the dry ingredients and mix well.
Fill large muffin cups about 2/3 full, sprinkle with walnuts and bake for 20 minutes.
The original recipe said it made 12 large muffins, but my batter only made 9 for some reason.
 Enjoy!
Hope you got through the time change better than I did.
 The other day I came home from work to the news that my two and half year old son had peed on the potty at school. I was so excited I ran out and bought a new potty seat, extra pants and thought about buying some pull-ups. But as I stood there with the package in my hand, I had my usual thought.....I bet I can make these.
I never used cloth diapers when my kids were babies. As much as I wanted to, I couldn't imagine all the extra laundry and work, and truthfully, I was never fully convinced that the extra water usage was better than the extra trash. But, since we're all better rested now, I figured I'd try out making some re-usable training pants.
I bought a great pattern for kids underwear from That Darn Kat. I first saw it here at Noodlehead.
I modified the pattern by adding a layer of PUL (which is a PAIN to work with) and 4 layers of cotton flannel to the front.
 I sandwiched the layers and basted along the edges to hold it in place.
 Then, I basically made 2 pairs of underwear, using the PUL panel for the outer and and just plain cotton for the inner. I put them together with wrong sides together and right sides facing out, and finished the waist and legs like the pattern describes.
This is far from my best handiwork, so don't look too close. The last pair I made I widened the waist band and finished the legs by putting the ribbing around the layers and stitching all at once, kind of like you would with bias tape.
 The boy was surprisingly excited to put them on after not taking a nap yesterday, and the best part....they actually work. Which means they work as far as holding all the pee in. And, he felt wet, which was part of my desire to make these. I think actually feeling wet helps them learn when they've peed and helps them want to use the potty.
We'll see.....
 Oh, and here are the girl, non pull-up version I made for my daughter. They are soooo cute and a great way to use up scraps.

 These blocks are pretty easy to make and are a really great handmade baby gift. I made one for my nephew as a late holiday present, and one to coordinate with this baby blanket. Now, I have a tutorial to share with you! Here's what you'll need:
Fabric: I used 4 fabric squares that are 4x4 and 2 chenille squares also 4X4. You need 6 squares in total, and they need to be square. What you use for fabric and the dimensions are really up to you. I used the same concept to make some pattern weights, tutorial here.
You'll also need:
- 4 pieces of ribbon about 2-3 inches each,
- some kind of stuffing (I used polyester Fiberfill),
- your sewing machine and thread
- a hand sewing needle and some thread
 Fold your ribbon in half, center and pin to one side of a fabric square.
 Lay another fabric square on top and sew down the side with 1/4 inch seam.
 Press seam open.
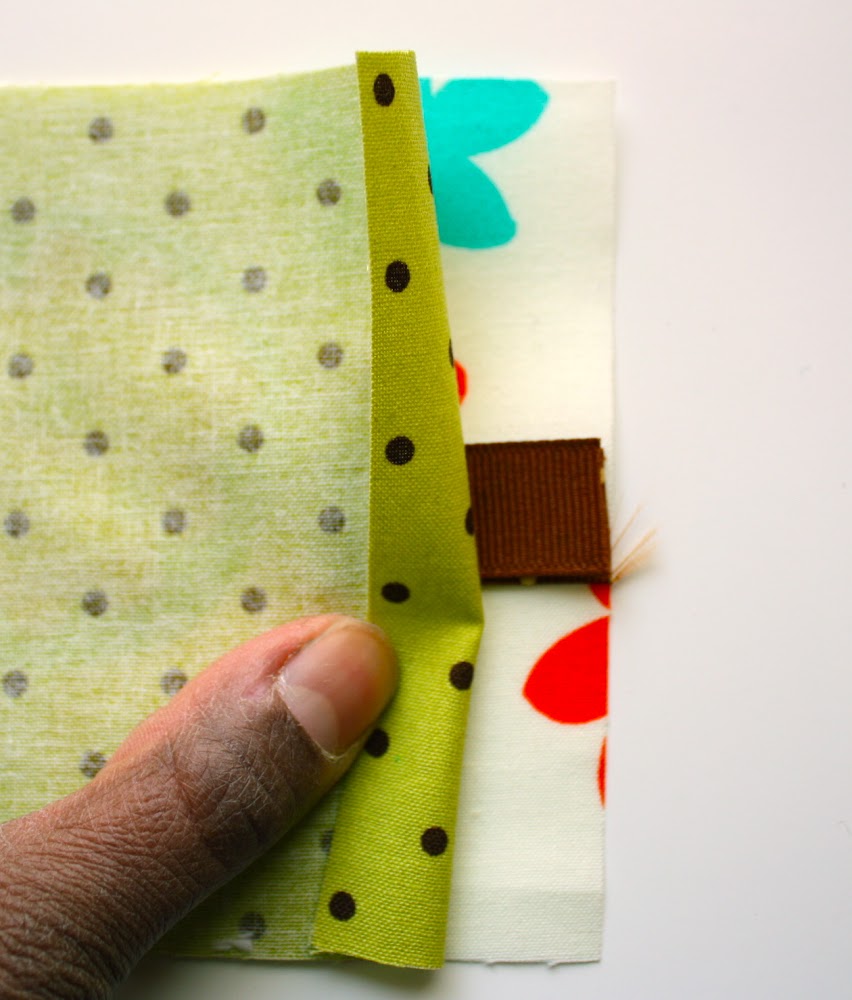
(you can also machine baste your ribbon in place first, as I did on the green square, below)
 Repeat with the remaining 2 squares and 2 pieces of ribbon until you've got 4 pieces in a row with 3 ribbons sewn in.
 On the first and last square, fold fabric over to the wrong side 1/4 inch and press. Attach the last piece of ribbon to one end of your fabric strip.
 With right sides together and 1/4 inch seam, sew the chenille squares to the square in position C.
  Now you need to start sewing sides together to form the block. It's a little hard to show this, but basically you will start by sewing side A to E and side D to E. It will look like this.
  Continue sewing each side to the chenille squares in the same way. Trust me, it will make much more sense when you're actually doing it. When you get to the last side, stop your seam at the 1/4 inch fold you made before.
  Here's what you'll have when you've sewn up all the sides, except the last side where you folded over 1/4 inch. You need to leave this side open for turning.
 Turn your block right side out....
 and fill.
 Pull the last 2 sides together, match where you folded the fabric, and pin. Use a needle and thread to blind stitch the side shut.
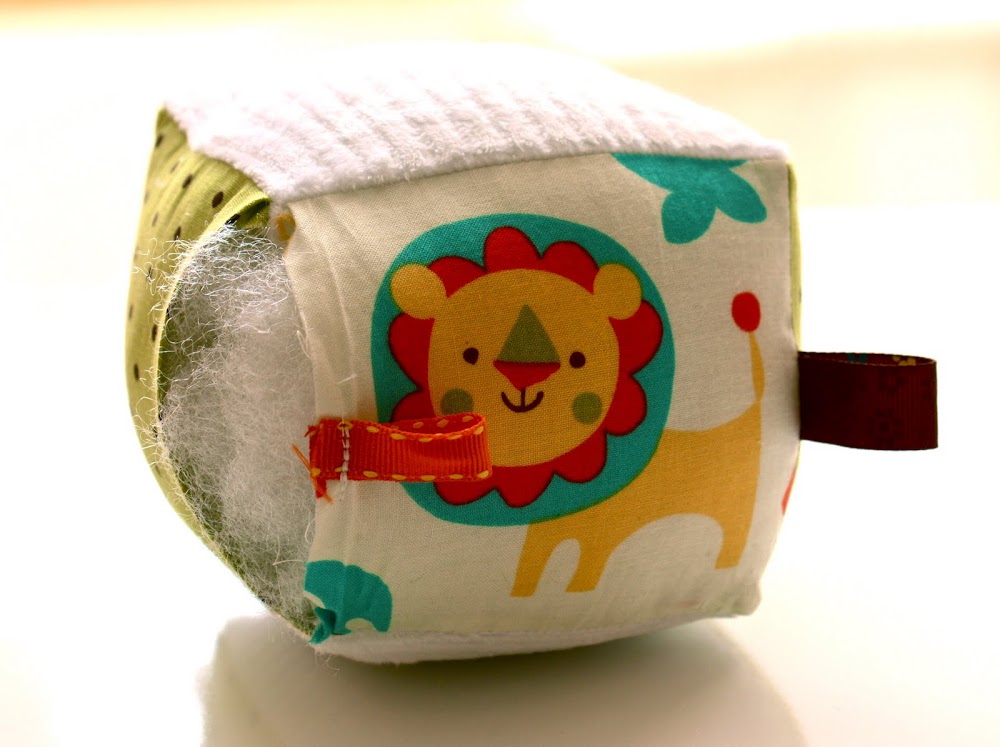
 So cute! I made this one to go along with a baby blanket I made for a friend which I posted here.
 Have fun! Leave me a comment and a link if you make one. I'd love to see!
 A Friday ritual. A single photo - no words - capturing a moment from the week. A simple, special, extraordinary moment. A moment I want to pause, savor and remember.
inspired by SouleMama
My dear friend Roselee, aka Jane of All Trades, made me this baby blanket almost 3 years ago (yikes!) when I was pregnant with my son. This was one of those gifts that for whatever reason, aside from it being so beautiful and amazing, I absolutely treasure. I think in part, it's because at the time I was finding it so difficult to find cute stuff for my soon to be arriving boy.
 It's hard for me to believe this was that little baby boy..
 Since I have a special attachment to this blanket, I decided to make one for a good friend who is expecting a little boy soon. The original pattern is from Amy Karol's, Bend the Rules Sewing, which is a great book I would highly recommend. I lent my copy to my sister, so I decided to wing it.
I cut my fabric (for front and back) and batting to be 34" by 34". Then layered the fabric with right sides together on top of the batting, and pinned.
 I actually wanted to try to make the scallops a little bigger, so I used a cereal bowl, to draw the edge. If you try this, don't make the mistake I made (and often make). I used a permanent marker. There were a few spots where I went too far with the scallop and as a result, you can see the marker when the blanket is turned.
 Here's what makes this project so easy, you just sew on your lines (make sure to leave and opening for turning) and cut later! I love that! I used pinking shears to cut away the extra fabric and then went back and notched the indents. Even still, it puckered a little when I turned it.
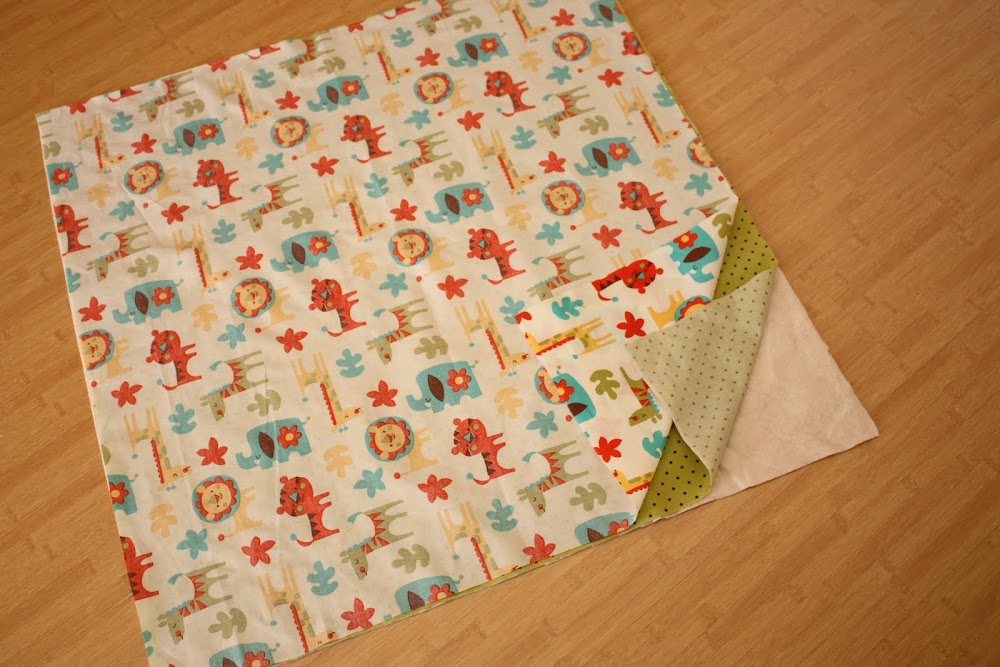
 Turned, top-stitched and quilted.

 I hope she treasures it as much I treasure mine....no pressure :)

 I went to visit my sister this weekend and went on a bit of a shopping spree! We hit the mall and our usual spots, and I also stopped in to her local Joanns. Even though most Joanns stores are pretty much the same, every once in a while I'll find one or two fabrics that either my store doesn't have or has sold out of.
  The fabric on the left is a retro floral knit that I haven't seen at my store. The owl fabric is one I've used a lot in knit, but my store sold out of the woven print a long time ago. The print on the right just jumped out at me and made me think of Spring.
 The best part of my shopping trip was picking up a few things to reorganize my sewing space. Here's my messy space before....
 And here's after. I got a new bookcase to store fabric and some magazine files for patterns.....and did some cleaning.
 I am totally in love with this little rail and container set I picked up for $5. It holds all my scissors and pens etc, and is at such a nice angle that it's easy to grab stuff and throw it back in. I almost wish I'd bought the longer rail and gotten more containers. Oh well, next time!
 I contemplated waiting for my husband to come home, but that's not my style. I'm a jump in and do it (and maybe ruin it) kind of person. And I'm proud to say that I did it! Maybe not the best job....I think the wires aren't supposed to show on the ends, but hey, it works! I did tell my daughter to stand back the first time I plugged it in and tried to turn it on. I was fairly convinced it might blow up.


