5.30.2013

High Low Maxi Skirt - TUTORIAL

 
Two years ago I bought a cute maxi skirt.  Looking in my closet the other day I realized, I've never worn it.  I always admire maxi skirts on other people.  But, when I look closely, I'm reminded of why I never wear them myself.  Most of the time, people are holding them up as they walk.  Not very practical, especially when you're spending your day at work or with kids, or both!
So, in the midst of my sewing slump, I had an epiphany.  I love the high-low skirt trend and I love the maxi skirt trend.  Why not a high-low maxi skirt!
This skirt is super easy to make and even easier to wear.  
Are you with me?  Let's get started.

All you'll need is 1.5-2.5 yards of stretchy fabric, depending on your height and size.  I only had a yard, so I made my waistband from a different color.  I used a rayon jersey knit that was very drapey and stretchy.
My 1 yard of fabric (36 by 60 inches) was the perfect length and width for my skirt.  In the photo above, I have the fabric folded in half for the skirt front and back.
 Fold the fabric in half again, so now it's quartered.  Measure around your waist, divide by 4 and add 1.  Using that measurement, make a mark that distance from the fold.  Now draw and angled line all the way to the bottom and cut. You should end up with a nice looking A-line shape.
 With right sides together, sew side seams.

Now let's do the waistband.  I ran out of the main fabric, so I'm using a different color.  Cut a piece of fabric that is 2/3 your waist measurement by 8 inches, and with right sides together, sew short sides making a loop.
Fold the waistband in half with wrong sides together, matching raw edge.
 Match the raw edge of the waistband to the raw edge of the skirt, pin and sew.
 Your skirt is almost done!
 Now, let's make the high low hem.  Lay the skirt flat so the the side seams are matched up.  Figure out how high you want the front, keeping in mind you'll still need to hem the skirt.  Draw a nice angle from the front to the back and cut.
 Fold the bottom of the skirt 1 inch to the wrong side and topstitch to hem. When you hem, keep in mind you'll be able to see the wrong side of the back of the skirt.  I used white thread for my bobbin and didn't realize until later that you can see it from the front.  Oh well, I definitey see another one of these in my future.

So fun.  So versatile.

5.29.2013

Mustaches and Motivation

 Mustaches are huge lately, though I'll be honest and say I don't quite get it.  They're cute, but I guess it's over my head. 
 I've been in a bit of a sewing slump lately.  A few failed projects coupled with nice weather = lack of motivation.  I have not however lost the motivation to fabric shop.  So to justify my recent Girl Charlee order, I added this mustache fabric to my cart under the guise of making some new boy clothes.  I made this cute newborn onesie as well.
The hubby is heading out to play music with the guys tonight, so I'm hoping once the kids are in bed, my mojo will return.  I've got some fun ideas....stay tuned and wish me luck.

5.14.2013

Skirt As Top TOP

 This cute scoop neck top by Skirt as Top has been popping up here and there and since the pattern is FREE, I thought I'd give it a try.
Though I do really like the style, I was worried it would be a bit big on me.  I'm a pretty small person and big and flowy doesn't really flatter my lack of curves (if you know what I mean).  So I grabbed a shirt with a similar cut and brought the side seam in a bit.  I ended up taking it in even more after finishing.

The style is great, really easy to make and to wear.  I would definitely recommend this pattern as a great way to dive into the world of knits.  For me, it helped me tackle my ever growing pile seen here. 
 

And, while you're thinking of shirts, don't forget that you need a skirt to go with that shirt!  Crafterhours has launched Skirt Week 2013. 
Are you entering?  Look here for some inspiration.  Maybe I'll make another Simplicity 2226 and play along.


5.11.2013

Knit-aholic

 
I have a confession....

I've been hoarding knits lately.  The time I've been spending acquiring fabric is starting to far exceed the time I'm been spending sewing fabric.  It's a problem.  But, I'm working on it, and hoping to tackle this pile this Mother's Day weekend.

What about you, do you love fabric shopping like I do?  Got any fun weekend plans?   

5.07.2013

Jersey Summer Dress TUTORIAL


The warm weather has finally arrived and with it, dress season.  I was playing around the other night and made myself 2 cute jersey dresses that I just had to share.  

A few notes before we get started.   
  • This is not a pattern rather a tutorial that requires that you have a shirt or tank top pattern that fits and that you generally know how to make.  Alternatively, you could use an existing shirt or tank for the top of the dress.

  • Fabric amounts will vary with size.  I always opt to buy more rather than less.

  • I sew all my seams with my serger.  You can definitely do it on your domestic machine, but I'm not going to talk about that here.  This post would be waaaay too long if I did.  Check out some tips HERE.

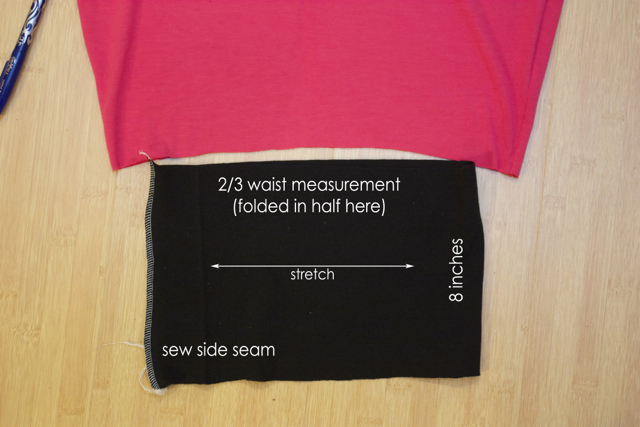
  • Always remember to pay attention to the direction of stretch of the fabric.  You want your stretch to go side to side for ease of wear.  When in doubt, test it out.
Here's what you'll need:
- about 2 yards of a medium weight jersey (I used THIS cotton spandex for all of mine)
- about 1/2 yard of contrasting knit for the border (this is optional - you can bind the neck and arms with the main fabric if you like)
- 1 yard 1/4inch elastic 
- T-shirt or tank top pattern that fits you (I made my pattern by following THIS tutorial)
- measuring tape for taking body measurements

 Figure out about where you want the skirt portion of the dress to start and shorten (or fold) your shirt pattern to that point.  Cut out a front and back (and sleeves if you are using them).  
1. sew one shoulder seam   
2. add binding to the neck and one arm 
3. sew the other shoulder seam  
4. add binding to the other arm.

There are many ways to finish the neck and arms.  I have a coverstitch machine with a binder (birthday present to myself a few years back).

  You can get the same effect using a bias tape maker or by cutting a 1.5 inch strip, folding it in half, pressing and then sewing on.  See HERE for a really great video on how to measure and sew neck binding.  You use the same principle for the arms.
If you are adding sleeves, put them in now, and sew down the side seams.  At this point you've basically got a short little top.  Try it on and make sure you like where the waist is.  You can trim it if you want it to be higher. 
Next, we need to take some measurements to make the skirt.  


 SKIRT LENGTH
Figure out how long you want your skirt to be by putting on your top and measuring to where you want it to fall.  Add 1.5 inches for a 1/2 inch seam allowance and a 1 inch hem.

I wanted the contrasting band to be about 3.5 inches when finished.  So, 3.5 inches + 1.5inches for seam allowance and hem, means my skirt length will be 5 inches shorter.

  SKIRT WIDTH
You also need to figure out how full you want your skirt.  I figured this out by looking at skirts and dresses I own and measuring across the bottom.  Add 1 inch to this measurement for each 1/2 inch side seam.  The wider your skirt, the more fully and gathered it will be.

For me:
Total skirt length 23.5" + 1.5" seam allowance and hem = 25" - 5" band = 20"

Bottom Band 3.5 inches + 1.5 inches for seam allowance and hem = 5"

skirt width 21" + 1" for side seam allowances = 22"
  
Cut 2 main skirt pieces and 2 contrasting band pieces using your measurements.  
For my dress I cut 2 main skirts that are 22" by 20" and 2 contrasting bands that are 22" by 5". 
  Sew the band to the main skirt panel with a 1/2 inch seam.  Press the seam allowance.
 Now lets make the skirt a little more A-line.  Fold the front and back skirt pieces in half.  Measure in 1.5 inches from the non-folded side.  Draw a line from that point to the bottom and cut along that line.
 Pin skirt front and back at the sides, being careful to match the band, and sew with a 1/2 inch seam.
Mark the center on the front and back of the dress top and skirt.
 With right sides together, pin dress top to the skirt bottom matching center markings and side seams.
 Sew the dress top to the bottom with a 1/2 inch seam.  The skirt is larger than the top so you will need to gently stretch the top as you sew. 
 Your dress is almost done!
 Try on your dress and measure around the waist (where the top meets the skirt).  We are going to add elastic so that the dress is a little more snug and gathered at this point.  Since the elastic will stretch out a bit, I measure my waist, then cut my elastic to be 1 inch shorter.
 Sew the elastic ends together to make a loop.  Fold in quarters and mark.  Match the quarter points to the dress side seams and top/skirt center markings.  Pin (making sure the elastic isn't twisted) and sew to the seam allowance, stretching the elastic as you sew. 
 The elastic will stretch out.  If you run some steam over the elastic, it will relax a bit.
 Fold the hem 1 inch to the wrong side and topstitch.  Try it on and make any necessary adjustments.

Phew, we're done!  I hope you enjoy this tutorial.  It ended up being more involved than I thought it would be.  But truthfully, it's not as hard as it may look.  Give it a shot....and do let me know what you think.

5.03.2013

Summer Dresses for Me

It finally feels like Spring in W. Massachusetts.  The perfect weather for some new Spring dresses.
I had a vision and remarkably, it came together pretty easily.  

I used a simple scoop neck T-shirt pattern for the top, cut short for where I wanted the skirt to start.  The skirt I cut a little larger than the bottom of the shirt, gathered it with elastic, and then attached it to the top.  Really, it's pretty easy.

I didn't take any photos as I put these 2 dresses together, in part because I wasn't sure they would work out.  Not only did they work out, but I can't decide which I like better.  I'm definitely going to make more, and can hopefully put together a tutorial.

So, find your favorite T-shirt pattern and I'll be back next week with some instructions.
Follow my blog with Bloglovin

4.21.2013

Backpack Baby Gifts


 My wonderful neighbor is single-handedly keeping my backpack business afloat.

She recently commissioned me to make 2 backpacks as baby shower gifts. 

 Matching bibs and washcloths complete the set.  Something for now, something for later.
 And a matching little purse for the big sister.
 It's really a win win situation.  For her, it's one-stop shopping.  And for me, I get to play with these fun fabrics.
Thanks Lisa!

4.14.2013

Another Simplicity 2226 - Summer Skirt for Me

 I recently got an email from a reader who'd seen this skirt I made and was wondering how I'd modified the pattern.  I used Simplicty 2226, and actually made a muslin, something I almost never do.  I've learned that for me, store bought patterns never fit right.  The muslin was really, really poofy, too big even though I'd used and followed my measurements, and altogether unflattering.  But, I thought that I might be able to make some simple modifications and in the words of Tim Gunn, make it work!
 I love this skirt and it's probably the first thing I made for myself that I actually wear a lot.  So, in case it helps, here's how I modified the pattern.  
  I cut a size 12, but ended up using a size 6 band.  I cut about 3 inches out of the center of the front, which ends up being 6 inches since it's cut on the fold.

I did the same on both back pieces. Since I took a lot of the poof out of the skirt, it needed to be wider at the bottom so I cut the sides to be more A-line rather than straight.
I kept the gathers just in the front middle, and very little gather in the back.  The invisible zipper always gives me trouble.  Anybody know of a good tutorial for putting in invisible zippers? 
I love, love, LOVE my new skirt!  And if it ever gets warm here in MA, I'm sure I'll wear it a ton.
 I bought this fabric last summer when my husband and I were in NYC with this skirt in mind...almost a year later, here it is. 
Lastly, the requisite photo with my face.  Trying not to laugh at myself....