

What little boy doesn't look cuter with a bow tie? Here's an easy tutorial for a bow tie that can clip on to any shirt. My little guy loves bow ties, but rarely wears a shirt with a collar. So a clip on is the way to go.
Easy enough to whip up for that special Valentine's Day outfit.

Here's what you need:
fabric rectangles, 10 x 6 inches and 4 x 2.5 inches
midweight fusible interfacing, 6 x 2.5 inches
1 clip on earring clip (I got mine HERE)
glue gun and felt scraps to attach the clip

Fuse the interfacing to the center of the wrong side of the large rectangle.
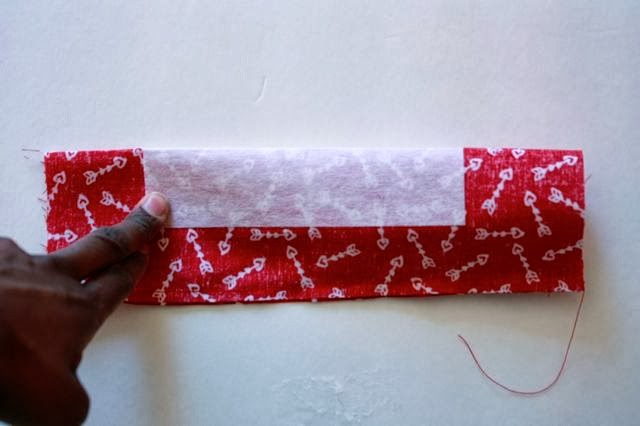
Fold the rectangle in half and stitch along the long edge with a 1/4 inch seam allowance.

Turn right side out and press so that the seam is in the center of one side (the interfacing will help the fabric settle this way)

Match the short, raw edges, with the previous seam on the outside.

Sew along the edge with a 1/2 inch seam allowance and pink or finish edge.


Flip the loop so that the seams are now all on the inside and centered at the back.


Fold in half lengthwise and sew a line of stitching about 2 inches long, about 3/4 of inch from the fold (white line in the photo below)

To make the center of the bow tie, take the smaller rectangle and fold in fourths;
fold in half the long way, unfold, fold the long edges to the center, fold in half again.


Top-stitch along each long edge.

Determine how tight you want the center loop to be and sew.

Trim edge.


Flip so the raw edge is on the inside.

Slide the loop around the bow.

Glue the earring clip to the back of the bow tie.

Glue a small felt square to cover the metal.

Cut a long strip of felt and cover the entire clip. I find that the felt is necessary to hold the clip to the shirt. The metal slips off fairly easily.

Adorable!

I am not adorable.

Okay...maybe I am.


