6.23.2013

Dress Obsessed and a Tutorial Preview

I've been totally dress obsessed here lately and somehow, I just found out about the Summer of No Pants sewalong.  I didn't officially join, but all this time, I've been playing along and didn't know it.
Summer for me is all about skirts and dresses.
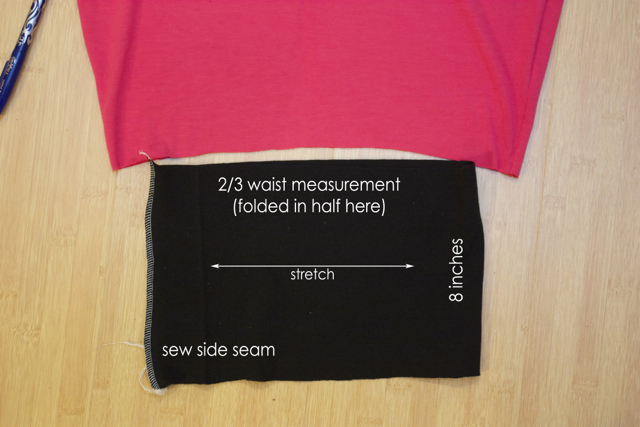
 While working out all the details of my Jersey Dress tutorial, I really came to understand basic, and I mean basic, knit dress construction.  I didn't realize it could be so easy.  I've made a few for the girl.

And a matching one for myself.  As an aside, she actually wanted me and her to wear our matching dresses when I volunteered for field day at her school.  How long do you think that will last?
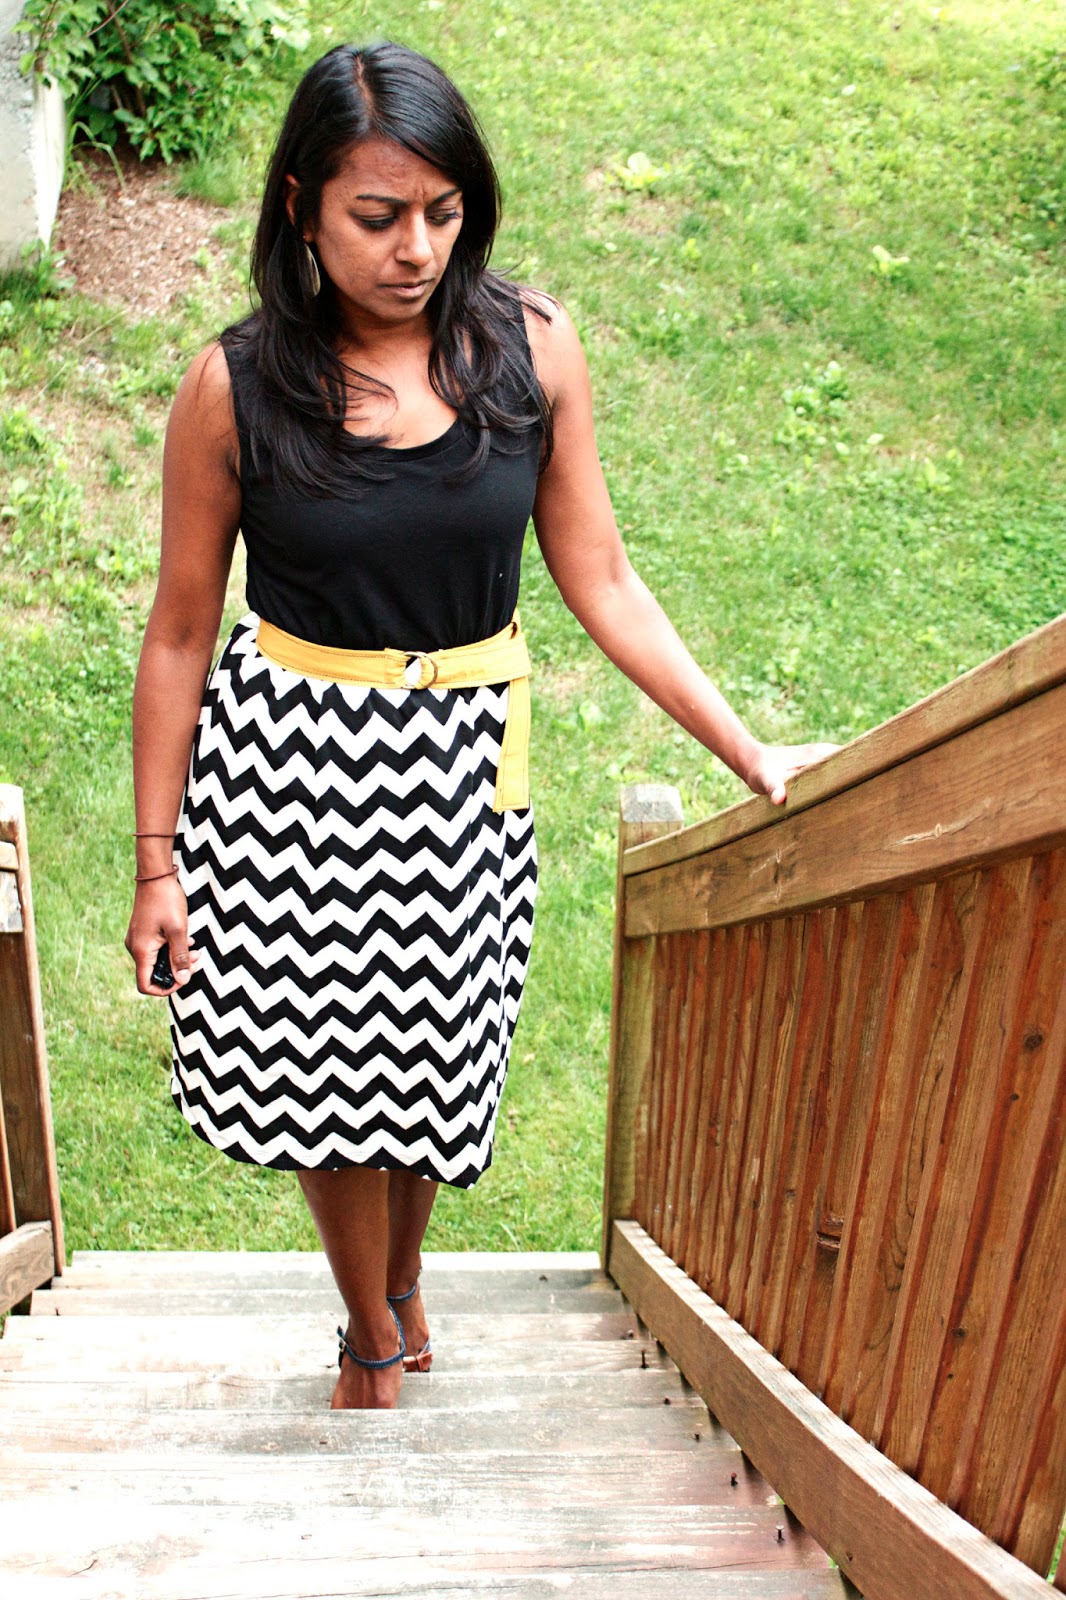
 A fun black and white chevron version.
 Mustard stripes with a cool back cutout.
 I'm not gonna lie, there are a few more that I didn't have time to photograph.  It's really fun.  Once you've got the basic pattern, you can pretty much cut and finish a dress in 3 hours or less.
 And just this weekend, I figured out, POCKETS!  I think my life may be complete.  Dresses with pockets!

Tutorial coming soon.  

If you haven't checked out my Jersey Dress Tutorial, go do it now.  Then you'll be ready and can make yours with pockets too!

6.15.2013

Teacher Gift: FREE PRINTABLE

 
10 months ago, we sent our oldest child off to kindergarten.  Our tentative, quiet, little girl cried every morning for the first week.  It was a tough week.
And what feels like a short 10 months later, she's blossomed into an outgoing, curious, little chatterbox who rushes to get dressed and teeth brushed at the mere mention of missing the bus.

 It's been an amazing year and I'm so thankful for the great school and teachers we have.
So I put together some little gifts to say thank you.

I found these cute metal tins at the Dollar Store and used a  hammer and nail to poke holes in the bottom.  We bought a 6 pack of thyme and a 6 pack of oregano at our local Farmer's Market and put one of each into each tin.  
Oregano is a great container plant since it self seeds and can take over a yard in no time flat.  Better in a container than in your lawn!
 
I used paper, punches, and sticks that I had around the house to make the labels.  

Free printable HERE.

The least I could do to thank our teachers for helping my little girl grow.

5.30.2013

High Low Maxi Skirt - TUTORIAL

 
Two years ago I bought a cute maxi skirt.  Looking in my closet the other day I realized, I've never worn it.  I always admire maxi skirts on other people.  But, when I look closely, I'm reminded of why I never wear them myself.  Most of the time, people are holding them up as they walk.  Not very practical, especially when you're spending your day at work or with kids, or both!
So, in the midst of my sewing slump, I had an epiphany.  I love the high-low skirt trend and I love the maxi skirt trend.  Why not a high-low maxi skirt!
This skirt is super easy to make and even easier to wear.  
Are you with me?  Let's get started.

All you'll need is 1.5-2.5 yards of stretchy fabric, depending on your height and size.  I only had a yard, so I made my waistband from a different color.  I used a rayon jersey knit that was very drapey and stretchy.
My 1 yard of fabric (36 by 60 inches) was the perfect length and width for my skirt.  In the photo above, I have the fabric folded in half for the skirt front and back.
 Fold the fabric in half again, so now it's quartered.  Measure around your waist, divide by 4 and add 1.  Using that measurement, make a mark that distance from the fold.  Now draw and angled line all the way to the bottom and cut. You should end up with a nice looking A-line shape.
 With right sides together, sew side seams.

Now let's do the waistband.  I ran out of the main fabric, so I'm using a different color.  Cut a piece of fabric that is 2/3 your waist measurement by 8 inches, and with right sides together, sew short sides making a loop.
Fold the waistband in half with wrong sides together, matching raw edge.
 Match the raw edge of the waistband to the raw edge of the skirt, pin and sew.
 Your skirt is almost done!
 Now, let's make the high low hem.  Lay the skirt flat so the the side seams are matched up.  Figure out how high you want the front, keeping in mind you'll still need to hem the skirt.  Draw a nice angle from the front to the back and cut.
 Fold the bottom of the skirt 1 inch to the wrong side and topstitch to hem. When you hem, keep in mind you'll be able to see the wrong side of the back of the skirt.  I used white thread for my bobbin and didn't realize until later that you can see it from the front.  Oh well, I definitey see another one of these in my future.

So fun.  So versatile.