

Two years ago I bought a cute maxi skirt. Looking in my closet the other day I realized, I've never worn it. I always admire maxi skirts on other people. But, when I look closely, I'm reminded of why I never wear them myself. Most of the time, people are holding them up as they walk. Not very practical, especially when you're spending your day at work or with kids, or both!
So, in the midst of my sewing slump, I had an epiphany. I love the high-low skirt trend and I love the maxi skirt trend. Why not a high-low maxi skirt!
This skirt is super easy to make and even easier to wear.
Are you with me? Let's get started.
All you'll need is 1.5-2.5 yards of stretchy fabric, depending on your height and size. I only had a yard, so I made my waistband from a different color. I used a rayon jersey knit that was very drapey and stretchy.

My 1 yard of fabric (36 by 60 inches) was the perfect length and width for my skirt. In the photo above, I have the fabric folded in half for the skirt front and back.

Fold the fabric in half again, so now it's quartered. Measure around your waist, divide by 4 and add 1. Using that measurement, make a mark that distance from the fold. Now draw and angled line all the way to the bottom and cut. You should end up with a nice looking A-line shape.

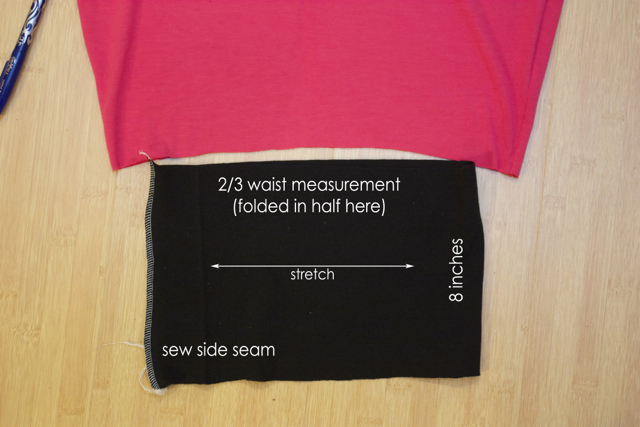
With right sides together, sew side seams.
Now let's do the waistband. I ran out of the main fabric, so I'm using a different color. Cut a piece of fabric that is 2/3 your waist measurement by 8 inches, and with right sides together, sew short sides making a loop.

Match the raw edge of the waistband to the raw edge of the skirt, pin and sew.

Your skirt is almost done!

Now, let's make the high low hem. Lay the skirt flat so the the side seams are matched up. Figure out how high you want the front, keeping in mind you'll still need to hem the skirt. Draw a nice angle from the front to the back and cut.

Fold the bottom of the skirt 1 inch to the wrong side and topstitch to hem. When you hem, keep in mind you'll be able to see the wrong side of the back of the skirt. I used white thread for my bobbin and didn't realize until later that you can see it from the front. Oh well, I definitey see another one of these in my future.

So fun. So versatile.


