*UPDATED 3-2-14*
Due to a large number of requests, I've updated the tutorial with the finished dimensions and a few clarifications. Enjoy!
I designed this insulated lunch tote for Sandra's Handmade Christmas in July series.
All the materials are machine washable, which for me, is what makes this worthwhile. I hate not being able to really wash my coolers.

Here's what you need:
2 pieces of medium weight fabric, main part of tote (16 in. X 16 in.)
2 pieces of medium weight fabric, contrasting part of tote (16 in. X 7 in.)2 pieces of PUL waterproof fabric (16 in. X 16 in.)2 pieces of Insul-Bright insulating fabric (16 in. X 16 in.)12 inch zipper
2 pieces of 1" cotton webbing, 24 in. each, for straps (or make your own)
Approximate Finished Dimensions:
12 inches across the top (at zipper)
11 inches tall
7 x 7 inches at the bottom
 Take the contrasting pieces of fabric and fold over 1/2inch along the long side, toward the wrong side of fabric. Place on top of main fabric pieces, with folded side at the top, wrong side facing the right side of main panel. Sew in place.
 Now, we're going to shape the bag a little. On the bottom edge of the bag, measure a 4in. X 4in. square in the bottom 2 corners, and carefully cut it out. Keep in mind you should be cutting through the contrasting fabric piece you just sewed in place. If you're not, you're at the wrong corner.
Do this for all layers (both main panels, PUL and Insul-Bright layers)

Here's what it should look like.

A little more shaping. Make a mark 2 inches from either side of bag.
 Draw a line from the corner of the bottom cutout.
 Cut on your line, for all layers (2 main panels, 2 PUL and Insul-Bright layers)
Now that we've got our bag shaped, here's some quick instructions if you want to make your own straps. Since the straps are 24inches long, cut a piece of fabric 24 inches by 4 times what you want the final strap width to be, in this case 1 inch. So you should have 2 pieces of fabric 24 x 4 inches.
Fold in half lengthwise, iron. Open it up, fold in half again, iron. Fold the ends in 1/2 inch, to finish. The following pictures should be pretty self explanatory.


 Topstich all the way around strap to finish.
OK, back to our lunch tote. Mark 3 inches in from each side, and 3 inches down from each side and pin strap to the exterior fabric only. (pardon the fabric change here, needed to add a few pictures after the fact...)
 Sew in place (to the exterior fabric only) making sure to not sew all the way to the top, since we still need to attach our zipper.
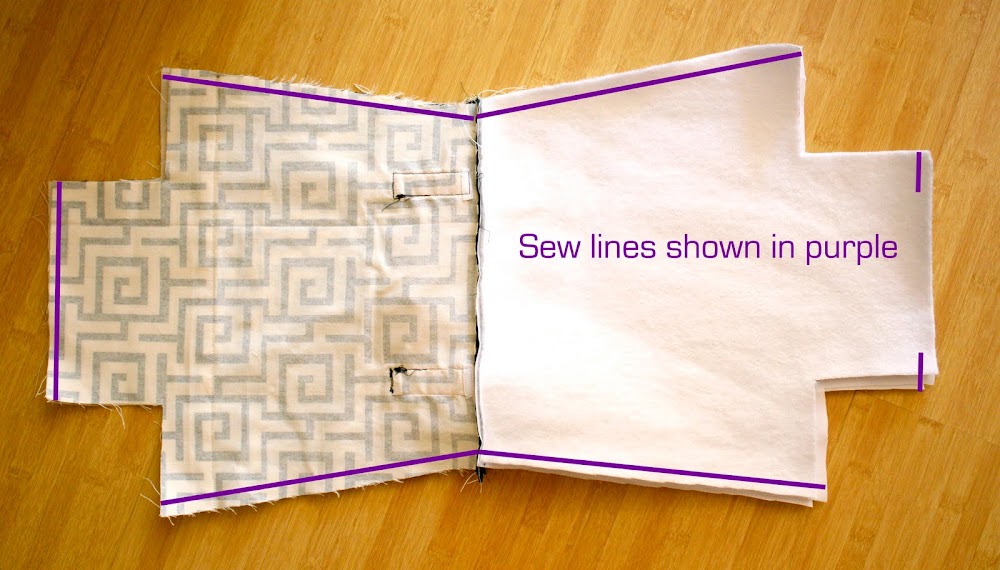
 OK, on to the zipper, my least favorite part of any project. Pin the right side of zipper (zipper pull facing) to the right side of one of your main bag panels. Lay the shiny side (right side) of the PUL on top of the wrong side of zipper, and the Insul-Bright on top of that. Using a zipper foot, sew a 1/4 inch seam through all layers.
 This is how it should look after sewing and folding back so right sides are out. (I had to get my seam ripper out a few times at this stage, so don't feel bad if you have to as well)
 Now for the other side of the zipper. Again, pin the right side of the zipper to the right side of the other main panel. The shiny (right side) of PUL to wrong side of the zipper, and the Insul-Bright underneath. Sew through all layers again.
 Here's what is should look like when all the layers are folded back.

 Fold the layers back so the main panels are right side together and the PUL right sides are together (Insul-Bright will be on the outside). Sew along the edges, the bottom of the main panel, and just 1 inch in from either side of the PUL/Insul-Bright lining. You NEED to leave this opening in the bottom for turning. Also, at this point, you should open your zipper, otherwise you won't be able to turn it. Last, be VERY careful sewing the sides, that you don't hit the metal at the end of the zipper. It can damage your machine, break your needle etc.
 The next step is to shape the bottom. Match the side seam with the bottom seam at the centers. Pin and sew across with a 1/2 inch seam allowance. Do this for both corners of the main panel and both corners of the lining (PUL/Insul-Bright layers together).
 It's a little hard to photograph, but here's what it should look like.
 Almost done! Carefully turn the bag right side out.
 Now we've got this opening to deal with. The best thing to do would be to hand sew it closed. I'm not that patient.
 I folded the edges in, and sewed a little seam across to close it up.
 Push the lining into the bag and zip it up. Ta-dah! Done.
Hope you hung in there. The finished product is really worth it.

 Let me know what you think!


 I am so in love with this lens, I can't say it enough. And, a new, larger, heavier lens, needs a new camera bag! I've been meaning to do this for a while, and this was just the kick in the pants I needed. I made the insert for the bag using this tutorial from Lil Blue Boo.


