

Update: You can take this pattern from a one-piece to a two-piece. Instructions HERE.
At first I was really intimidated by the thought of trying to make a swimsuit, but with some trial and error and some help from the Creative Chicks I did it....and you can too!
A few tips before you get started:
- Take your time! I'm not usually someone who pins a lot, but it definitely pays off for this one
- I found using a walking foot helpful
- I used a serger for some of my seams, but it's really not necessary since swimsuit fabrics don't unravel
- Do check out the Creative Chicks tips. They have some more details on the elastic finishing etc.
OK, let's dive right in :)
Here's what you'll need:
- around 1/2 yard (or less) of swimwear fabric (nylon/spandex or polyester/spandex)
- swimwear lining fabric (optional)
- 3/8 inch swimwear elastic *see this post for more info on supplies
UPDATE: I've put together a tutorial for making your own pattern here.
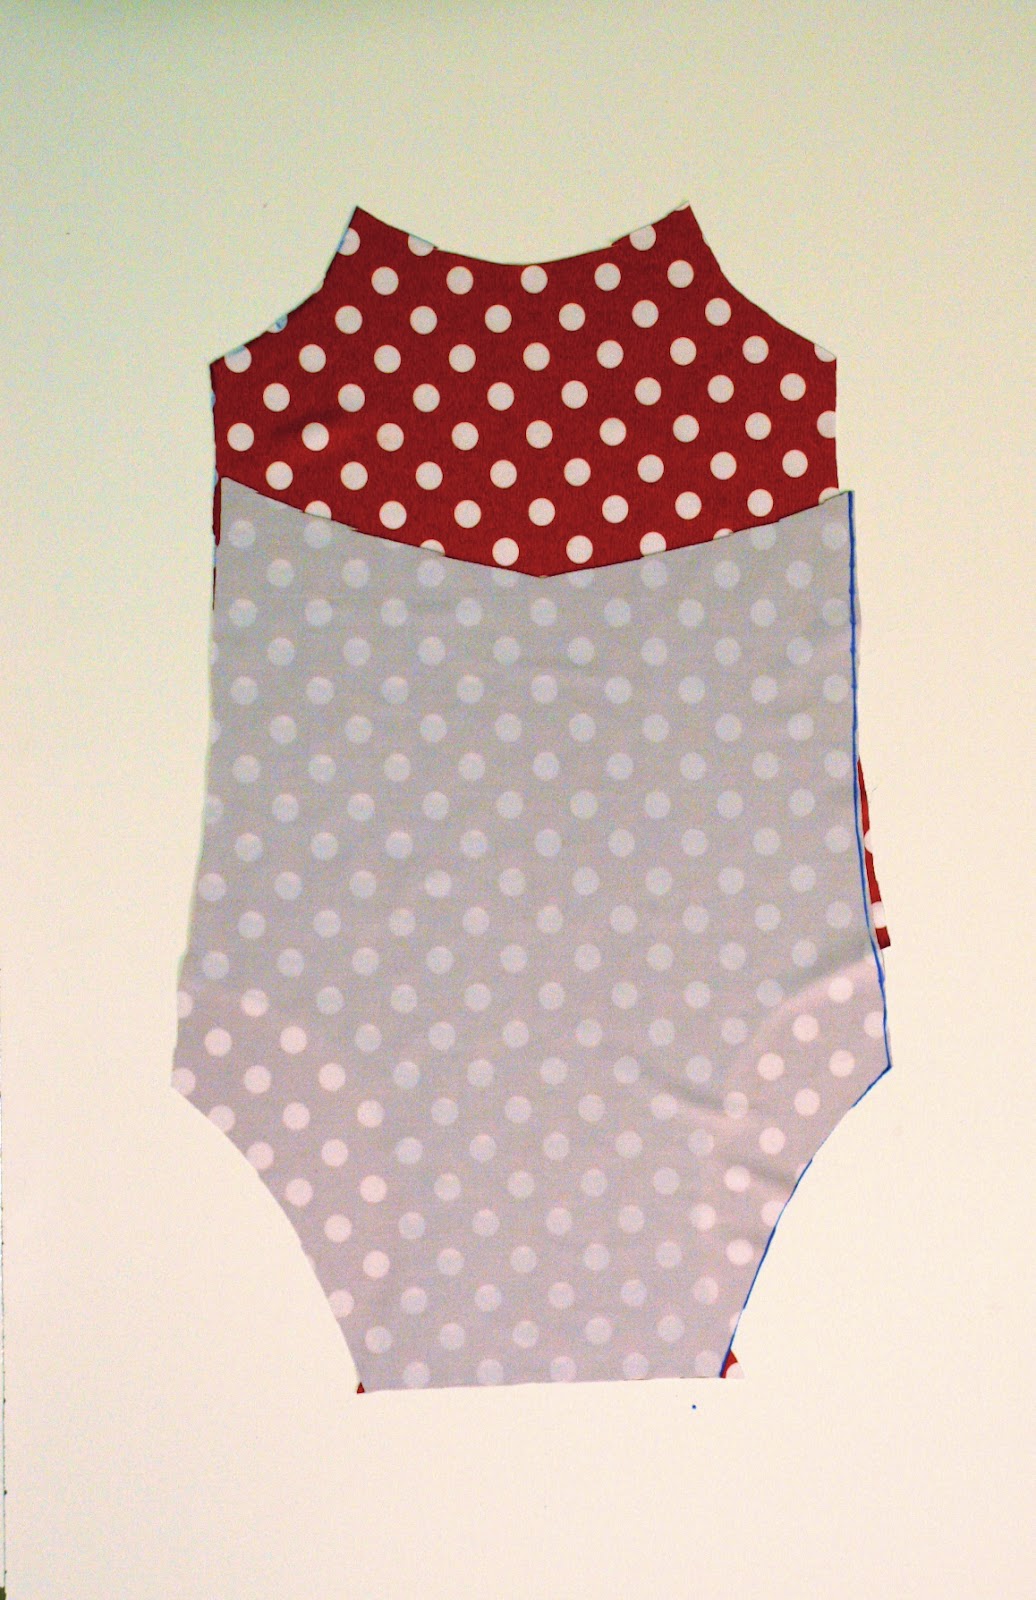
All seam allowances are 1/2 inch unless otherwise noted.
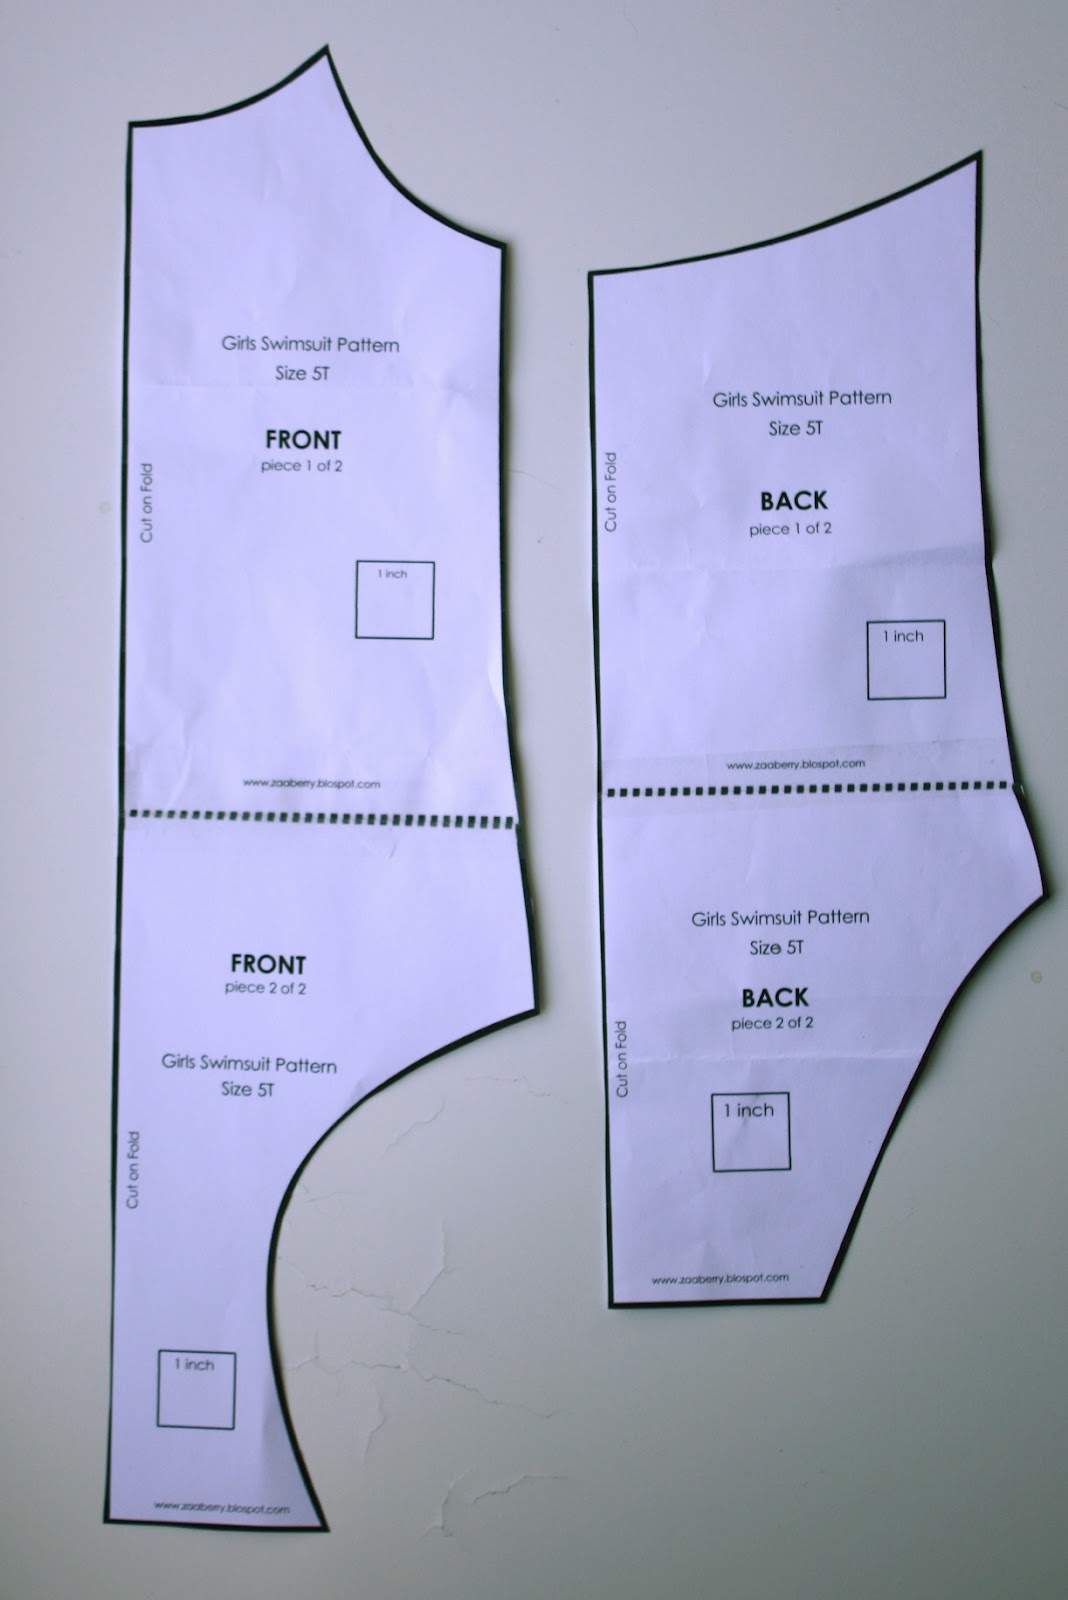

Lay the back piece on top of the front piece, with right sides together.


Cut 2 pieces (one for each leg opening) of elastic, 13.5 inches each. Sew the ends of the elastic together to make a loop.


Along the front side of the leg opening, pin the elastic without stretching the elastic or the fabric. There will be extra fabric along the bum side. You will stretch this as you sew. Pin the center of the remaining elastic to the center of the bum side of the leg opening.


Here's what it should look like after sewing.

Fold the elastic to the inside and top-stitch. I used a double needle.
Do the same for the other leg opening.

For the ruffle, cut a strip of fabric that is 2 inches by 10 inches. Gather along the top edge. Pin to the top of the suit and then trim along the armholes.


1. With right sides together, sew the strip to the top with a 1/4 inch seam allowance.
2. Using a wide zig-zag stitch, and without stretching the fabric or elastic, sew the elastic on top of the strip you just sewed.
3. Fold the fabric over to the wrong side and pin.
4. Top-stitch.

To finish the rest of the top of the suit and create straps, cut a piece of fabric 2 inches by about 42 inches. You want to have about 12 inches on each side that will become the straps.
So, leaving a 12 inch tail on each side, sew the strip with right sides together to the top edge of the suit, just as you did before.
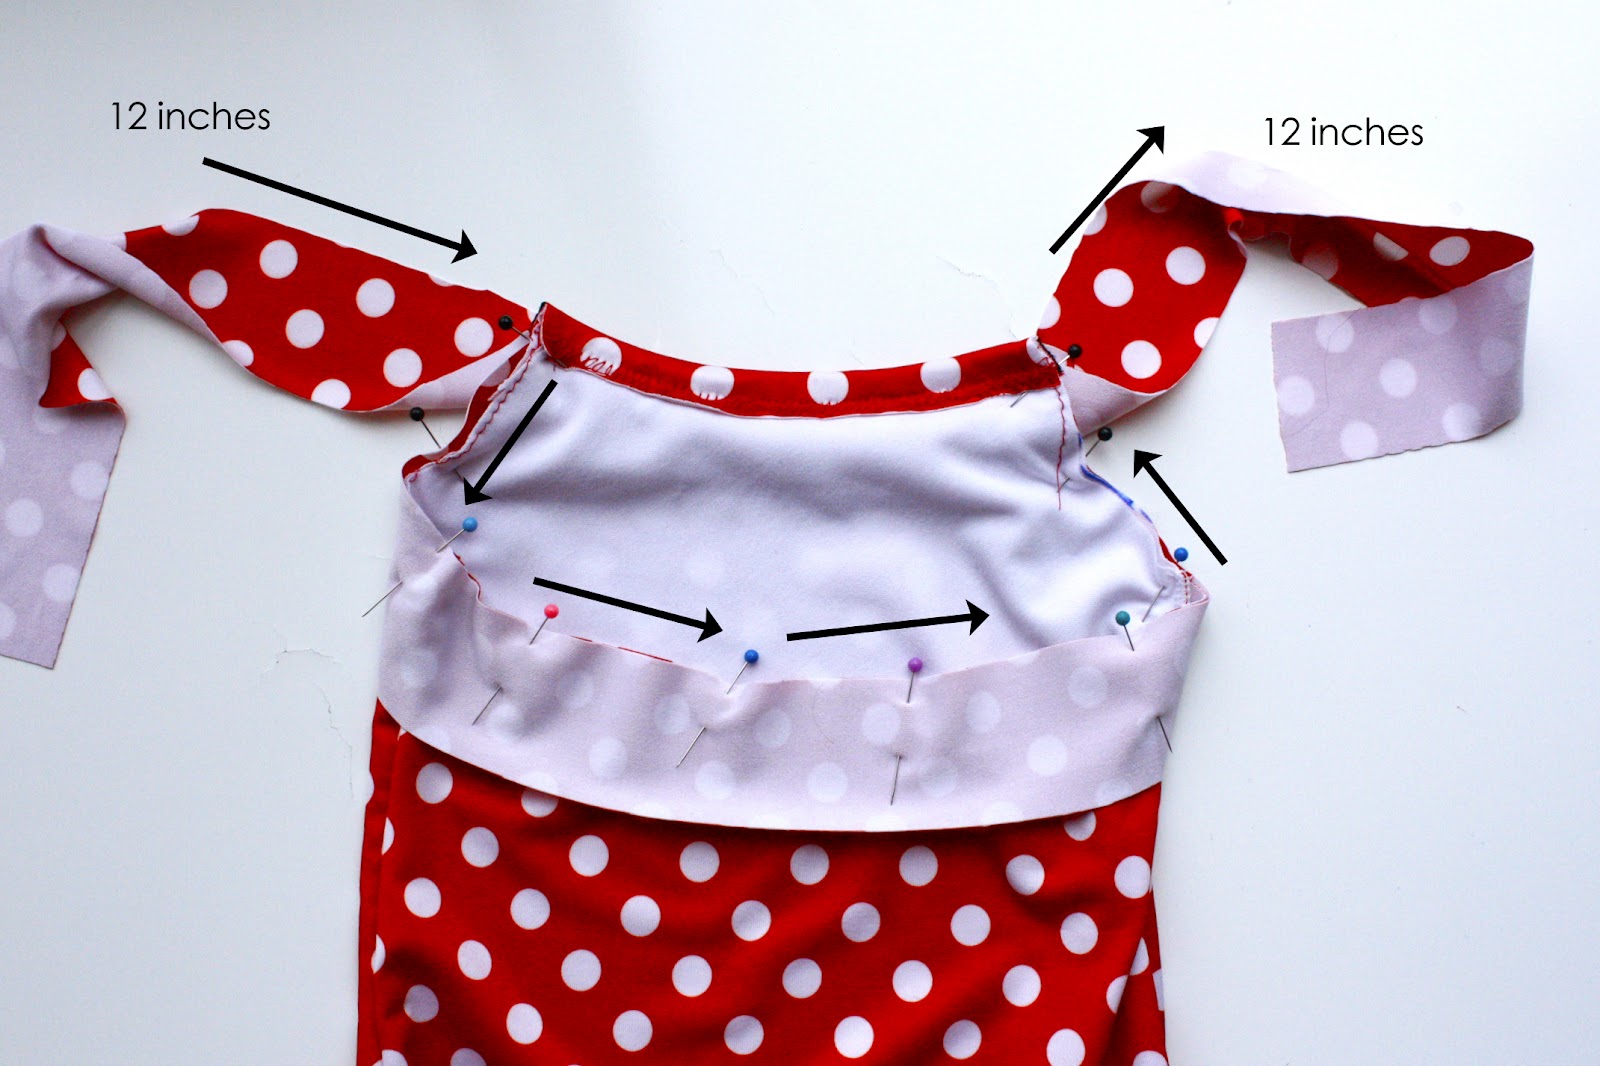

Then sew the elastic on top, just as before. You can see I accidentally stretched mine a little. Don't worry if this happens to you, it will all flatten out later.

Top-stitch.
Trim.

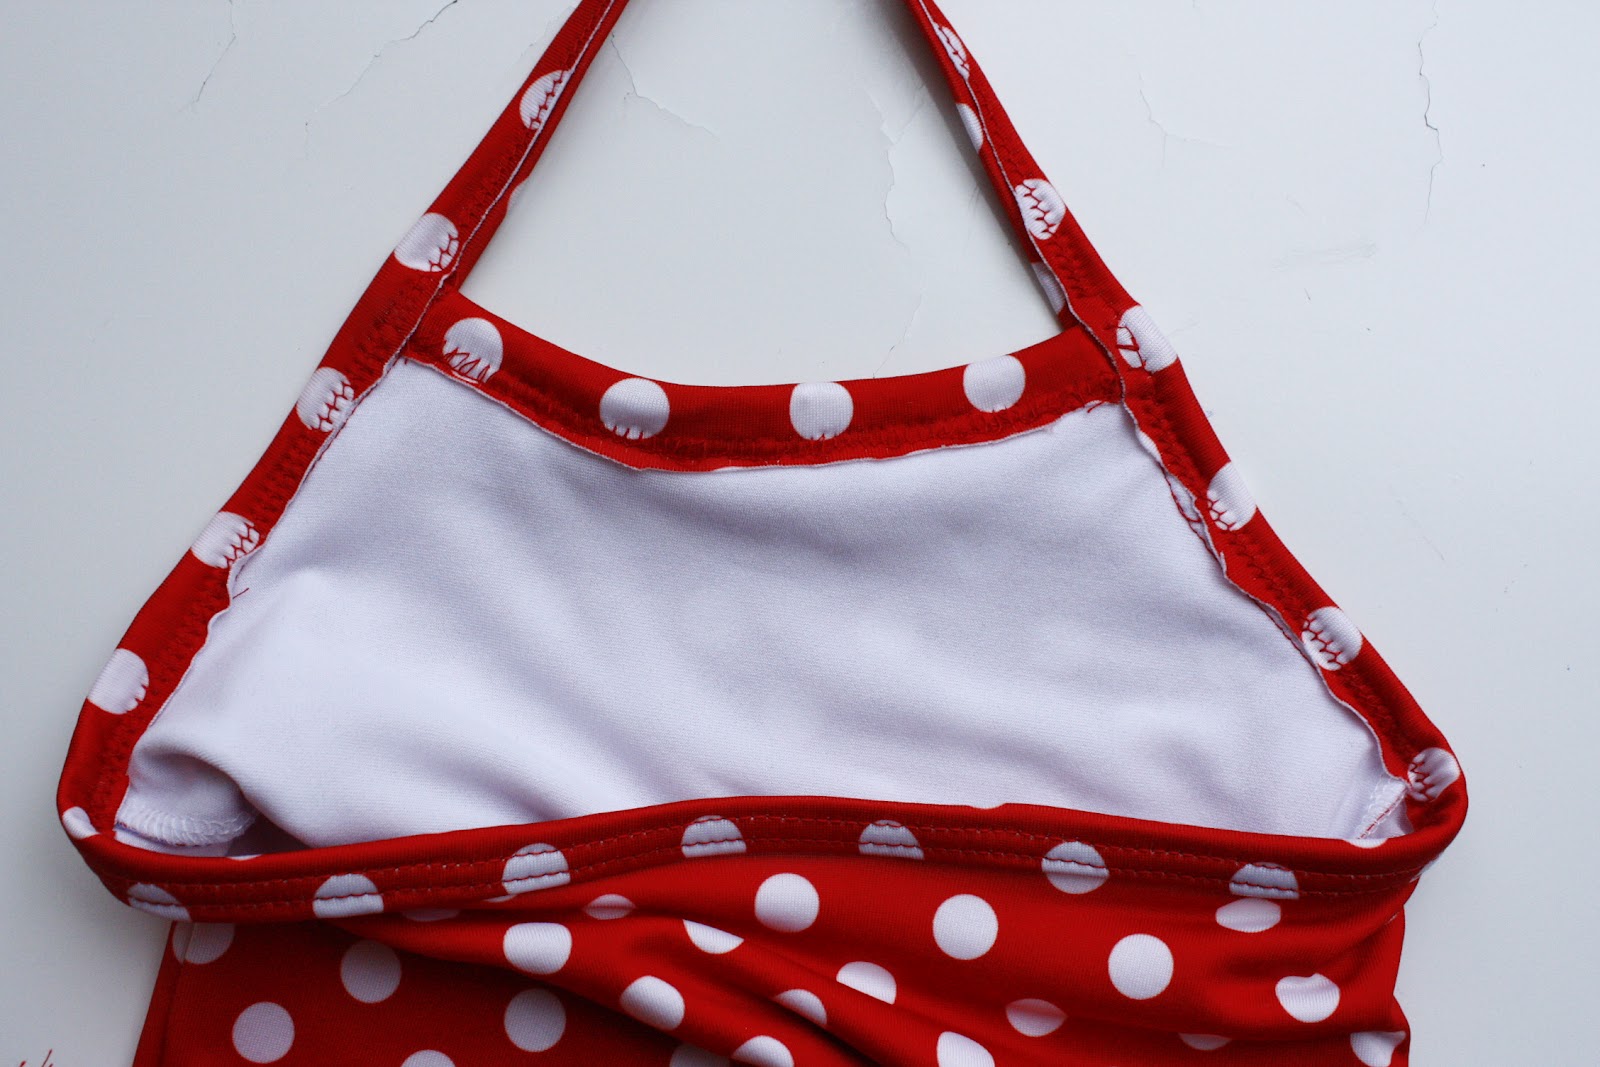
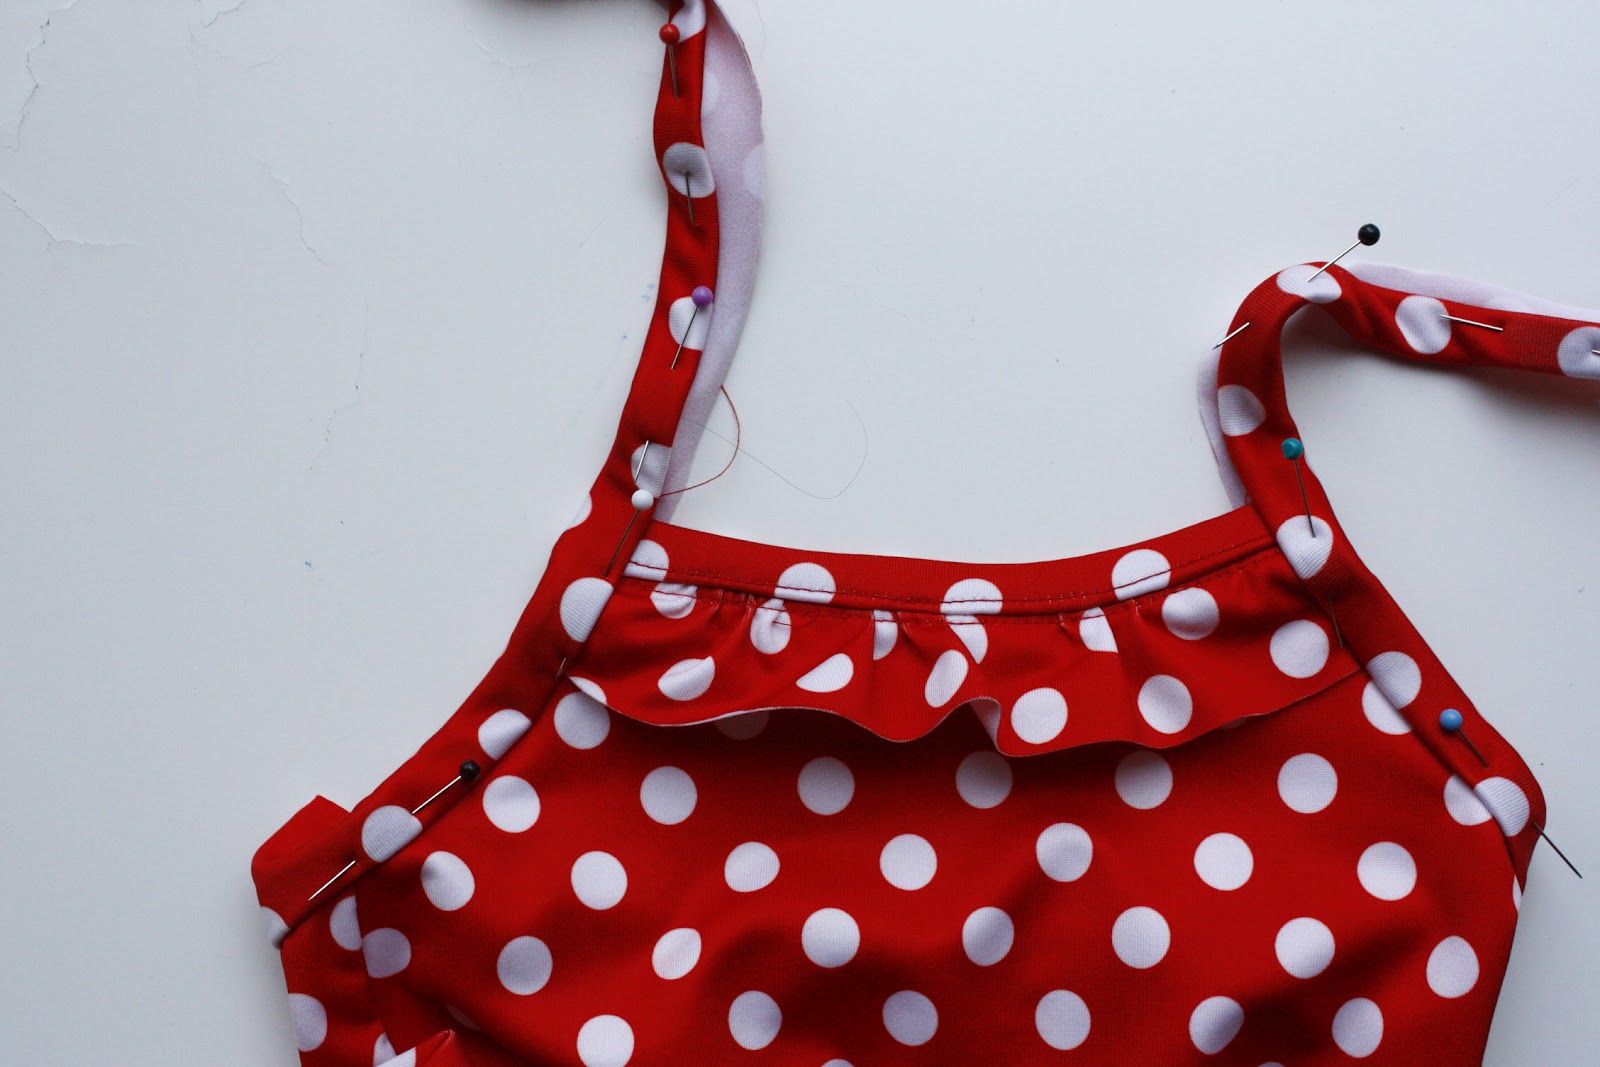
I like to have the straps cross, that way they don't fall down. If you don't want them to cross, you'll have to cut them shorter.
Pin straps about 4 inches from each side seam.

Sew in place.

All done and ready for the pool!


A bum that fits! Who could ask for more.
Definitely let me know what you think! I put a lot of work into this, and even still, I'm sure it's not perfect. So any and all feedback is great!
Oh, and if you're wondering about the pattern, I'll show some basic directions for tracing an existing bathing suit in a separate post. This one was getting a bit long!
Very impressed. I was just looking at my daughter today by the pool and thought, "I want to learn to make swimsuits." Now, I have no excuse. Very cute!!
ReplyDeleteI would love to know how you did the pattern. GREAT tutorial. I have been wanting to attempt this for quite some time and now I feel like I might be able to do it. Thanks for sharing.
ReplyDeleteSuper Cute.
ReplyDeleteThanks! I really want to try this in the Summer.
ReplyDeleteMy feedback is: WOW! Love it! And thank you so much for the tutorial. I don't have girls but even so I think this is a great contribution for the sewing world! Congratulations
ReplyDeleteOh, I'm SO excited about this! I bought some pink/black zebra print last week in anticipation for your tutorial! Thank you SO MUCH for posting this, it looks very clear. My daughter is a 4T, so I'd love to know how to size it down a bit, if you have any info. I'd really appreciate it, but if not, I totally understand! You've already given so much.
ReplyDeleteThank you, thank you! ~Katie
What an awesome tutorial and thank you SO much for the pattern. I wish I could make one right now but I have a few obsticals; one my Granddaughter is 5 weeks old so I'll make one in a few years and two, I am afraid of my serger. LOL I have made it a point to learn to use my serger this year already though. Or should I say learn it AGAIN!? I bought this more years ago than I want to admit and it was top of the line, now discontinued. I took all the lessons and then came home and it's never been used at home even once. I should be kicked hard I know. My Viking store manager said I should just oil and use it but I really feel like the thing should be taken in and checked over and cleaned well since it's not been touched in more than 4 yrs and has not been covered either.
ReplyDeleteI REALLY do appreciate the pattern and tutorial. So many cute things are on blogs and they always tell to trace around clothing that the child wears but those aren't good for us Grandma's that are not close to their grandchildren's home and can zip over and trace something they wear now. I love all the adorable things but I really appreciate the patterns like you've given so much as well.
Oh look at you Ruby!!!
ReplyDeleteLOVE this! Awesome job, girl!
:)
I cant wait to make my niece a swimsuit. Just the other day she asked me to make her one because she didnt like the ones at the store.
ReplyDeleteHello, Love it!! How much fabric did you use for this 5t pattern?? Thanks!
ReplyDeleteI LOVE IT :) Thank you for the tut.
ReplyDeleteI made this today and it is wonderful!!!! Thank you so much for sharing this. My favorite thing about it is that it covers her back side without riding up.
ReplyDeleteI have a feeling you are going to be a pretty popular mom at the pool!!!! Darling swimsuit...and even more fabulous tutorial!
ReplyDeleteI am so sorry but I can not figure out how you got from step 2 to step 3 on the ruffle. I sewed the ruffle to the front top piece right sides together but I can't figure out how to get the ruffle facing outward. The wrong side of the fabric facing outward (hope that makes sense). Please tell me what I'm doing wrong :/
ReplyDeleteHi there. If I'm thinking of right part, then you want to sew your ruffle not with right sides together, but with right side on top of right side, if that makes sense. You're going to cover the raw edges with binding, so there's no turning required. Please send me an email if you need more help. I'm happy to explain further! Thanks!
DeleteOk I get it now...thanks for your help :)
ReplyDeleteThanks so much for sharing this tutorial. The swimsuit looks great. This will be my next project. Thanks again.
ReplyDeleteThank you so much for the amazing tutorial! I also used your instructions for making my own pattern. I made one for my daughter and now I have friends asking for bathing suits for their girls! I linked to your blog in my post http://parentsadventures.blogspot.com/2012/04/audreys-new-swimsuit.html
ReplyDeletethis is an adorable swimsuit, thanks for the free pattern! I happen to have a size 5, YEAH!
ReplyDeleteThis looks fantastic! Thanks for the tutorial and pattern - I will certainly be making this for my two girls for this summer!
ReplyDeleteGreat tutorial! Thank you very much for taking the time You've just made my life so much easier!
ReplyDeleteThank you so much for the tutorial! I used it today and it worked out great! My daughter is a size 5 and the fit was spot on.
ReplyDeleteMade it today.... instructions were clear, fit was great! Thanks so much!!!
ReplyDeleteGreat tutorial!
ReplyDeleteFeatured it here...
http://sewprettysewfree.blogspot.com/2012/06/girls-swimsuit-tutorials.html
Competitive or fitness swimmers often need advice on selecting, sizing, and fitting swimwear. While appearance may not be as compelling an issue in competitive swimwear as it is in fashion swimwear, its fit and functionality are still just as important, if not more important.
ReplyDeleteI had sewn a bikini for myself based on a downloadable pattern and having some scraps, wanted to make a swimsuit for the daughter of a really good friend. I scoured the internet high and low before finding your tutorial which was AMAZING! Thank you so much. I had to shrink the pattern about 20% and add a few centimeters in the horizontal measurements, but I followed your sewing instructions and created the most adorable little swimsuit. My friend loved it and it fit her daughter like glove. I was so proud of myself. Thanks again! :)
ReplyDeleteThis comment has been removed by a blog administrator.
ReplyDeleteThanks for the tutorial my 4-yr-old daughter always has problems with swimsuits we buy at the store fitting right because she is so tall. I've found some pretty fabric at the Fabric Fairy and will be making her a suit for our beach trip this summer. Thanks for your help!!!
ReplyDeleteAwesome!!! I just made my first suit!!!! I am so excited!! It fits our four year old perfectly!!!! With the deal I got on the fabric it cost me less than a dollar!!!! FABULOUS!!! Thank you!
ReplyDeleteThat's so great! I'm working on a larger size pattern too, so check back in the next few weeks. Also, if you have a picture, I'd love to see it in the Flickr group. Thanks!
DeleteWhat size pattern are you working on? My daughter wears and 8 and I have such issues with bathing suits not covering her booty! This tutorial looks fantastic though and I can't wait to see what you do with a larger size. If you need any info for a size 8 just ask! :) gretaminton@sbcglobal.net
DeleteI enjoy your blog very much and will follow it with pleasure! :))))
ReplyDeleteI used this tutorial about a year ago and the suit turned out adorable! What kind of thread do you use, I used viscose and found after a while it started to break down, do tell!?! Thanks!
ReplyDeleteThank you! My daughter is a competitive diver and swimmer. Clearly, we need lots of bathing suits around here. I sew all kinds of things and just made her a bikini. Now I can make her a bunch of cute bathing suits and save myself some money.
ReplyDeleteThis is great pattern. I made a leotard for my daughter and it is beautifull. Thank you very, very much.
ReplyDeletegracias por compar
ReplyDeletetir y muy bonito todo, felicidades. santamiau@hotmail.com
That is awesome! I'm so drawn to the idea of sewing bathing suits, but continue to be terrified of trying. I'm pinning this for whenever I can work up the courage! Thank you! :) Lisa
ReplyDelete